How to do a ‘Mohawk’ French Braid

Hello everyone! Today I wanted to show you a modern, edgy twist on the traditional French braid hairstyle. I actually just tried this out one time when I was bored with how my hair looked, and it looked great! Anyways, let’s get right into it. 
Step 1: Brush out your hair so it’s tangle-free, and then comb it back so you have no part. 

Step 2: Take a medium-small section of hair from the very front of your head, close to your face, and separate it into three section. 

Step 3: Braid the sections together for one rotation, then add more hair to each section of hair and braid it in. 

Step 4: Continue adding sections into the braid until you have used all of your hair, then braid the rest of your hair in a regular braid. 

Final Result: 


This hairstyle is basically just a normal French braid that starts closer to your face with smaller sections added in. Because it starts father up on your head, you achieve a ‘mohawk’ effect which can go great with an edgy outfit, or you could dress it down to look more girly. If you feel like this hairstyle is not something you would wear, you can just wear it overnight and when you take it out, you will result in beautiful heat-less beachy waves. I really like this hairstyle. I think that it’s super easy to do, and it’s very versatile. 
That’s all for today’s post! I hope you guys enjoyed it, and see you next time. 

4 Strand Lace-Up Braid

Hello Everyone! Today I went shopping with my friend for a dress for my formal school dance. So I’m super excited to make a post for getting ready for formal night later this month. Anyways, today I’m going to show you guys how to do this cool hairstyle I discovered. I found the directions for a braid on Pinterest, but it I looked totally different when I did it so I’ll just tell you my way of doing it. Let’s get started! 
Step 1: Part your hair to the side. 

Step 2: On the side of your part with more hair, grab a 1-inch section in the front, divide it in two, then divide those sections in two. 

Step 3: The easiest way to think of doing this is to number each section from left to right, 1-4. 

Step 4: Take section 4 and put it over section 3. Then take section 2 and put it over one, then wrap it under one and over section 4 (which will be in the right side of the middle at this point) 

Step 5: Renumber the sections left to right, 1-4, and repeat step 4 until you get to a stopping point. 

Step 6: Secure the braid with some bobby pins, and put a cute bow or clip over them if you would like.  
The finishing result: 

  
This little braid is pretty easy once you get the hang of it, and it looks super cute for school. I love this for a more casual day. I hope you guys enjoyed this post, and see you next time! 

5 Ways to Make Your Ponytail Pop

Hey guys! Today I wanted to do a hairstyle post for you. This is perfect for if you want a simple, quick hairstyle for the morning but you want to make it more stylish, or if you have PE at school or are going to the gym and want to keep your hair out of your face while still looking cute. I will show you 5 ways to spice up your ponytail. So here they are! 

1: Hair Accessory 

One really easy way to make your ponytail look cuter is to add a pretty hair accessory. One of my favorite things to do for this is to put a little adorable bow on above my ponytail, but a little bit to the side. Of course you can use other things like flower clips, but bows are my personal favorite.


Red Velvet Bow: Forever 21, $3

2: A Unique Hair Tie

There are all sorts of hair ties you could use, and if you find a really cool looking one, it is great for making your hairstyle look more in style. 


Jeweled Fox Hair Tie: Charming Charlie’s, $6

3: A Braid along one side of your ponytail

This is probably the most time consuming. For my braid, I did a French fishtail braid and I will teach you guys how to do it. 

Step 1: Comb your hair back so there is not part. 

Step 2: Take a 1-inch section of hair in the middle area of the front of your head, then divide it in two. 

Step 3: Take a smaller strand on each side of the bigger strand. Starting with the left side, add the small strand to the bigger strand on the left. Then grab the smaller strand along with some additional hair and add it to the inside of the big strand on the right. Continue this on the opposite side. Then continue this across the side of your head until you get to a point where you want to stop. 

Step 4: Bobby pin the braid to your head, and comb back the rest of your hair. Gather all of the hair into a ponytail. 

The result: 


4: Simple Twist

This is a very simple hairstyle that you can do in literally 5 seconds. This looks so cute, even if you don’t put your hair in a ponytail after doing the twist. 

All you do is you comb your hair back, then grab a section on either side of you head, twist it back, pin it, then put all of your hair into a ponytail. 


5: Ponytail with a Twist

This one is pretty easy once you get the hang of it, but I think it’s easier and it looks better with a side ponytail. 

Step 1: Comb your hair back and put it into a loose ponytail. 

Step 2: Pull the hair tie down your ponytail a little bit, then divide your hair into two even sections above the hair tie. (This will create a hole) 

Step 3: Pull your ponytail up and over through the hole, so the sections twist. Then pull the ponytail tight. 

The finished hairstyle:  


These are some of my favorite ways to make a ponytail look cuter. I hope you guys enjoyed this post, and will try this stuff out. Here is the link to my other hairstyle posts: 

https://nicolefemme2000.wordpress.com/category/hairstyles-2/

See you guys next time! 

How to Waterfall Braid

Hi guys! Today I wanted to show you one of my go-to hairstyles. This braid is very intricate and difficult looking, but it’s extremely easy to do. Let’s get right into this! 

Step 1: Part your hair to the side. 


Step 2: On the side of your part with more hair, take three small strands of hair and braid them one cycle. 

Step 3: Next, pull the top strand in-between the other two strands, and twist the other two pieces around it. 


Step 4: Take strands of hair and pull them through the other two strands, repeating Step 3 until you have reached the back of your head. 

Step 5: Pin back your braid with a cute pin or bow if you would like to make this look even cuter. 

Finished Hairstyle: 


And you are done! This looks super hard, but it’s so simple and quick! I love to wear this to school when I don’t feel like putting much effort into my hair but I still want to look nice. I hope you guys enjoyed this post, and see you next time! 

5 Cute, Quick, and Easy Hairstyles for school

Hey guys! Today I wanted to show y’all some really cute and quick hairstyles for school. I know that most of you are going to school and want to sleep in as much as possible, so here is how to have super cute hair that takes very little time.

Before we get into the hairstyles, I just want to show you guys an awesome brush that I used for all of these hairstyles. It’s a double-sided brush, one side detangles your hair and the other side has boar bristles to calm your hair and make it shiny.

IMG_1611

Evolve Double-sided Hairbrush: Walmart, $5

1. Twisted Ponytail

1) Part your hair to the side with your part starting around the middle of your eyebrow/ the arch of your eyebrow.

Side-part-hair

2) Take all of your hair to the side of your head without the part and comb it to smooth it out and keep it in place.

image

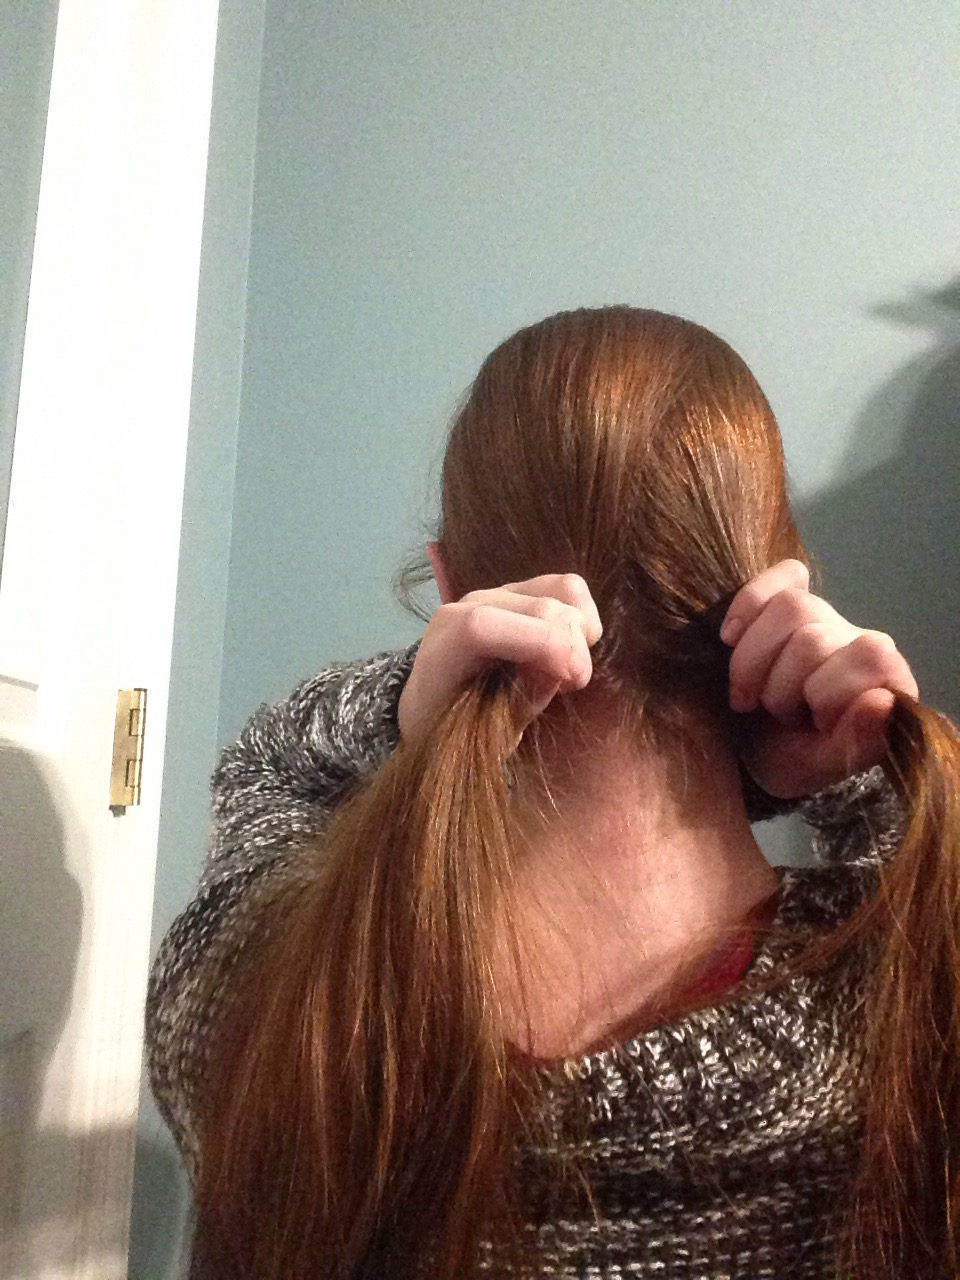
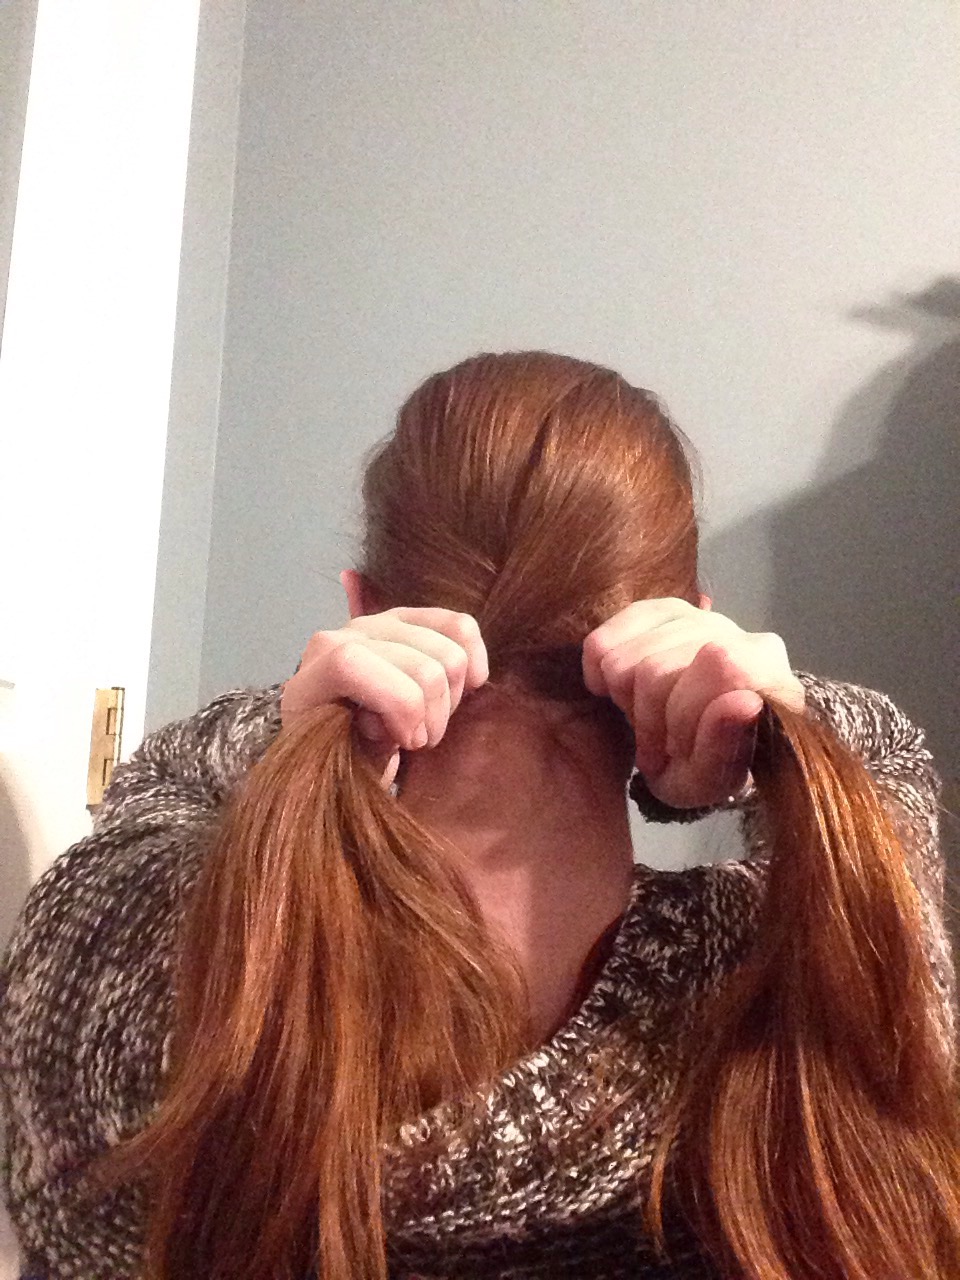
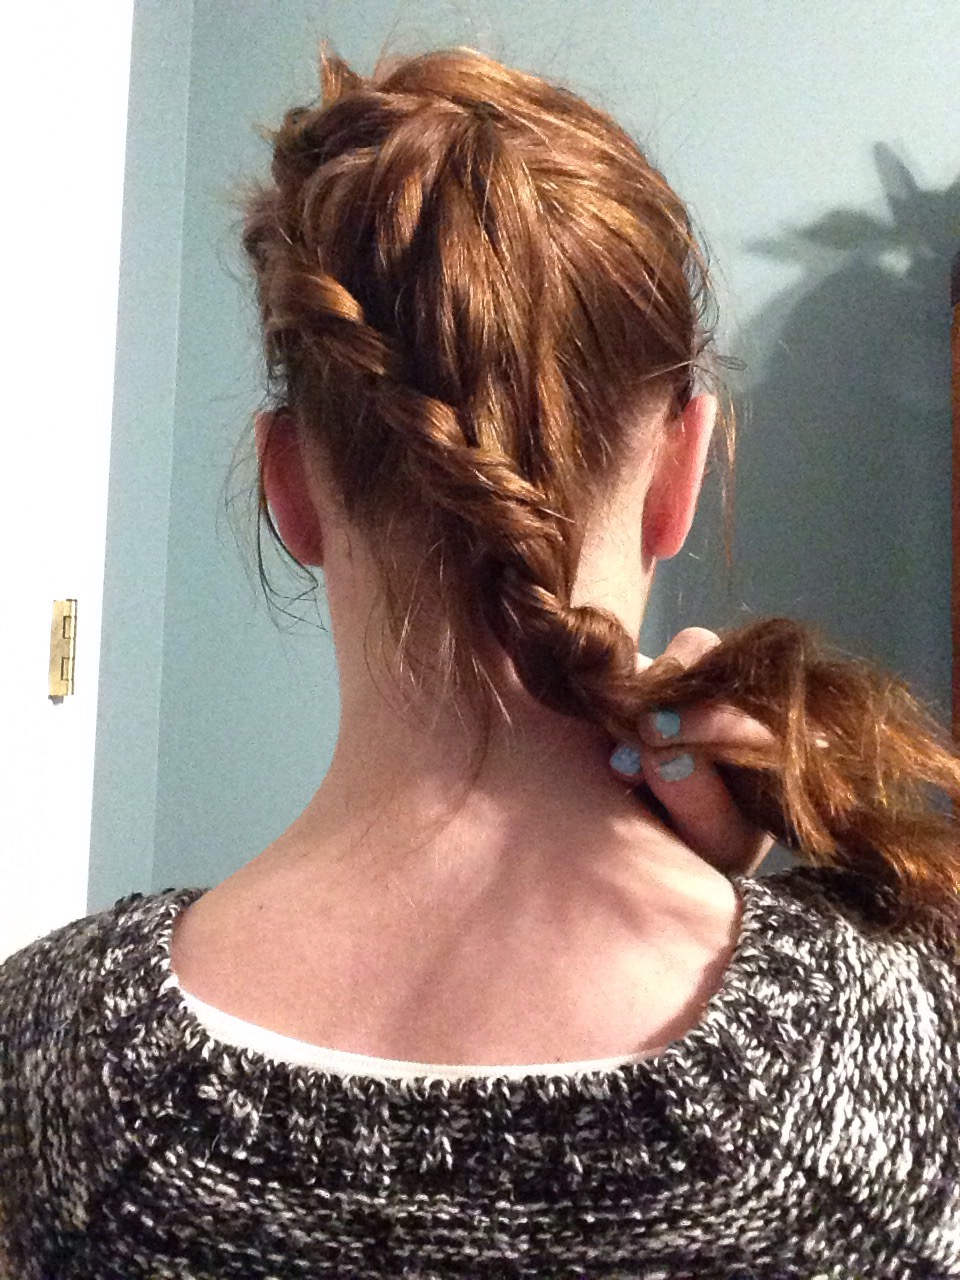
3) Put your hair in a loose ponytail.

image

4) Make a hole in the middle of your ponytail above your elastic, making sure that the hair on either side of the hole is of equal size.

image

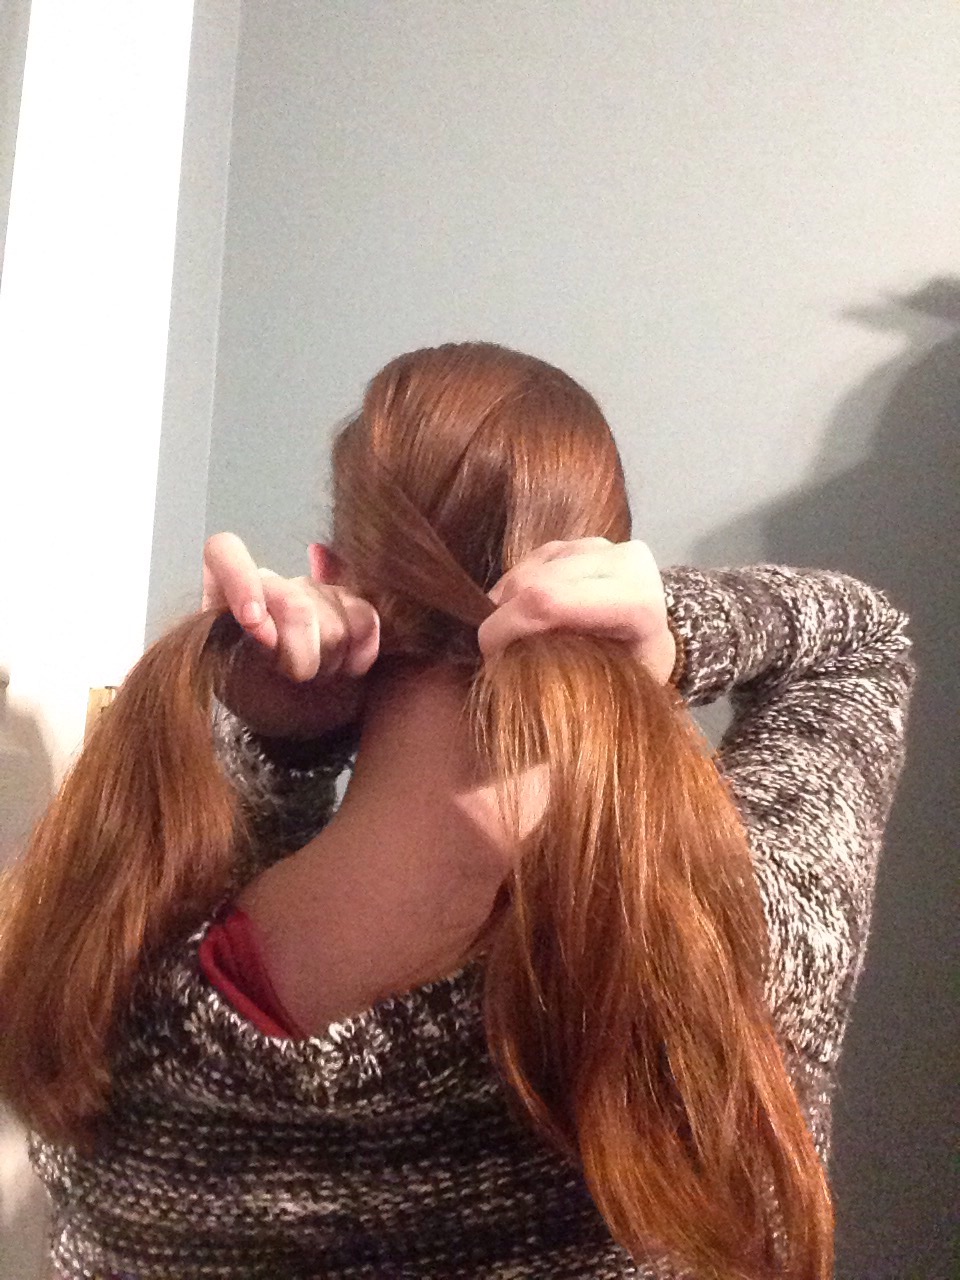
5) Pull the rest of the ponytail through the hole. It should look like two loose twist tied together.

image

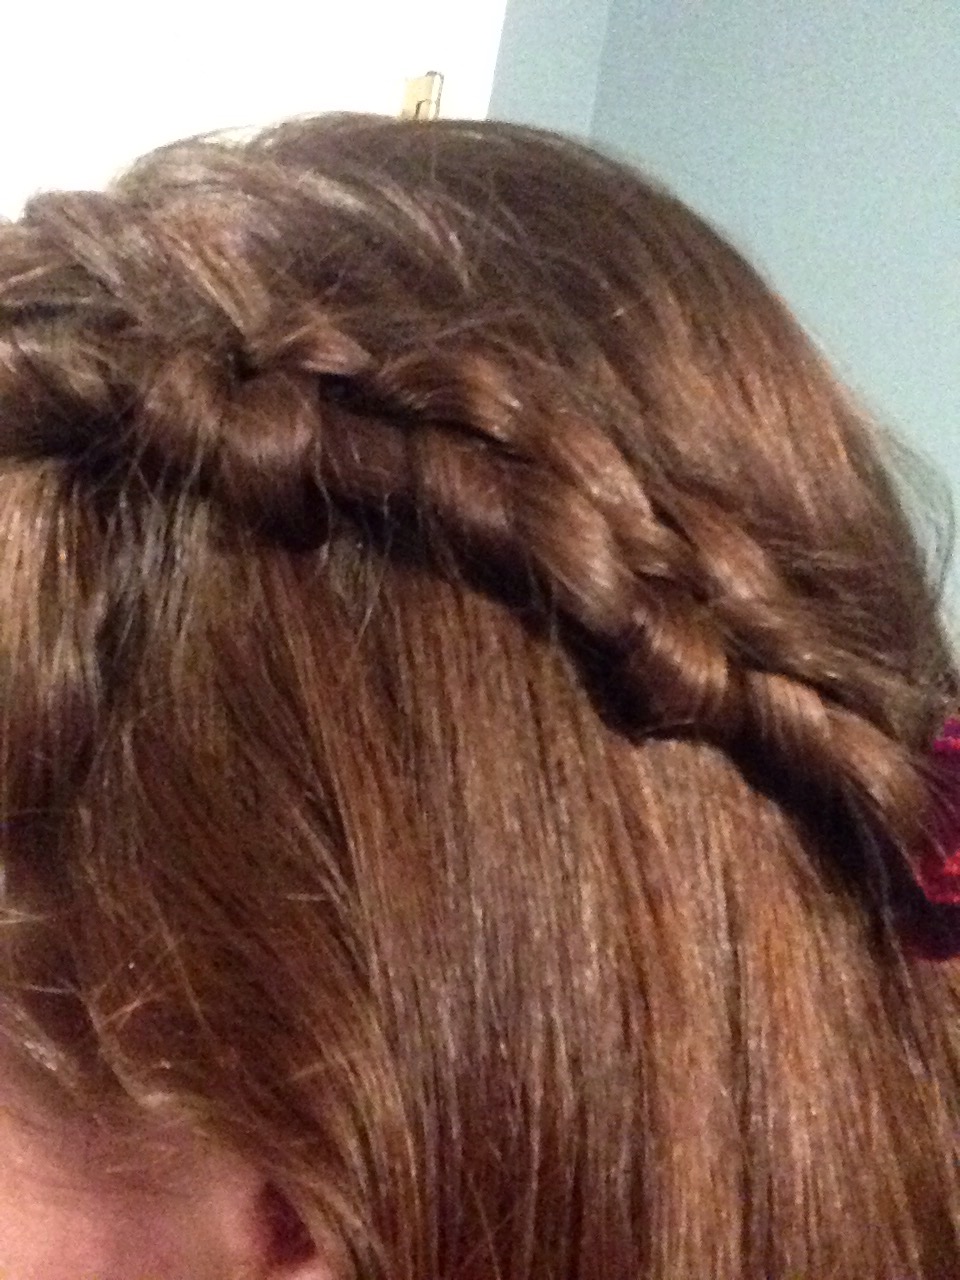
6) Tighten your ponytail by separating it into two sections below the elastic and pulling them apart. It should look like this from behind:
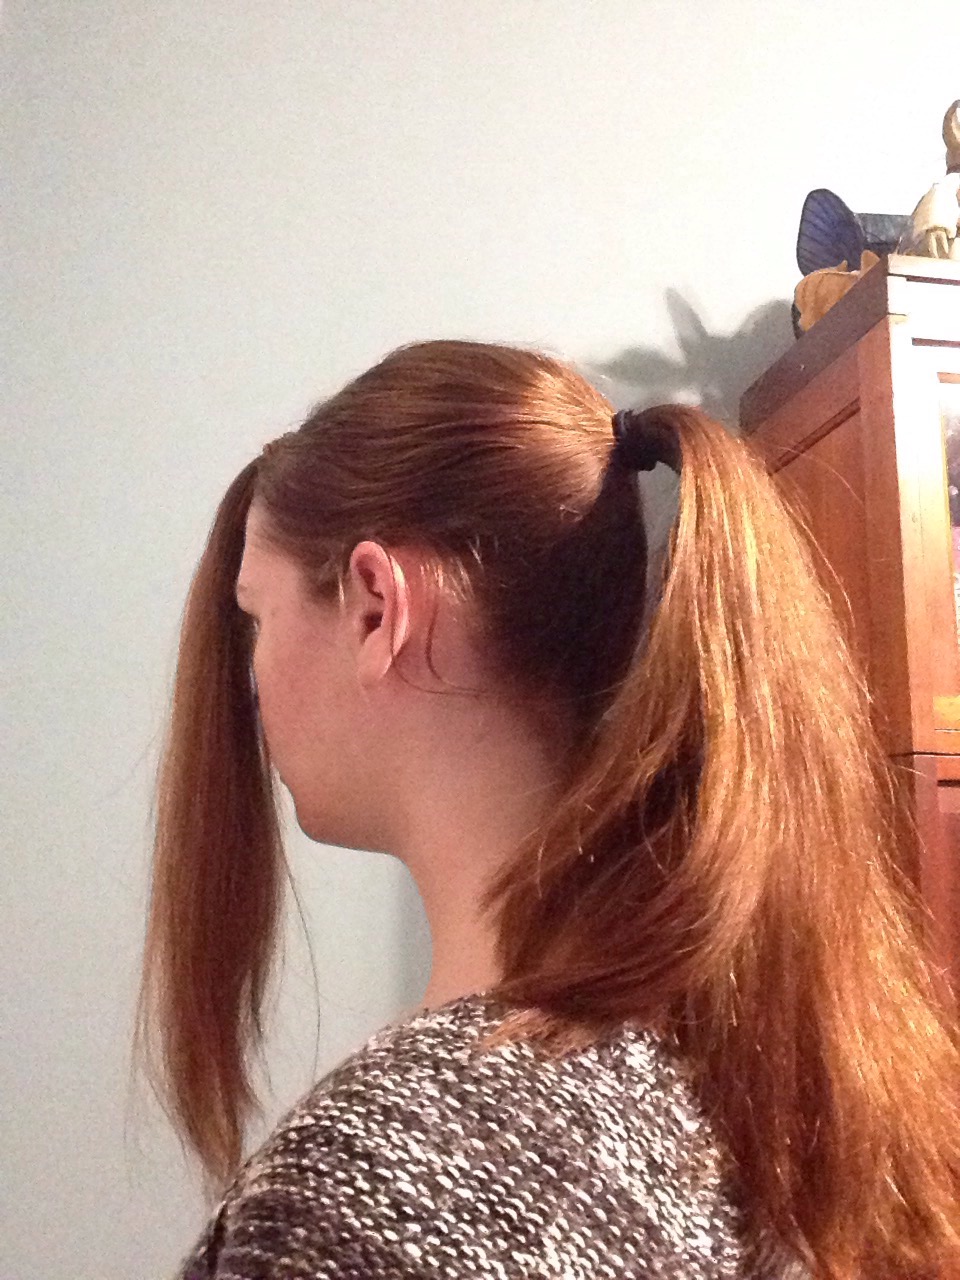
image

2. Retro Twists

1) Put your hair in a side part like in the hairstyle above.

2) Grab the front section of your hair from the bigger side of the part and comb it out away from your face.

image

3) Loosely twist the section back a little bit, then push it forward to create a small bump. Secure the bump with bobby pins.

image

4) Loosely twist the rest of the hair from that section  back and secure with bobby pins or a cute hairclip if you want.

imageimage

Purple Jeweled Hairclip: Charming Charlie’s, $10

5) From the other side of your part, take a smaller section of hair from the side and twist it back tightly, then secure it with a type of pin or clip.

imageimage

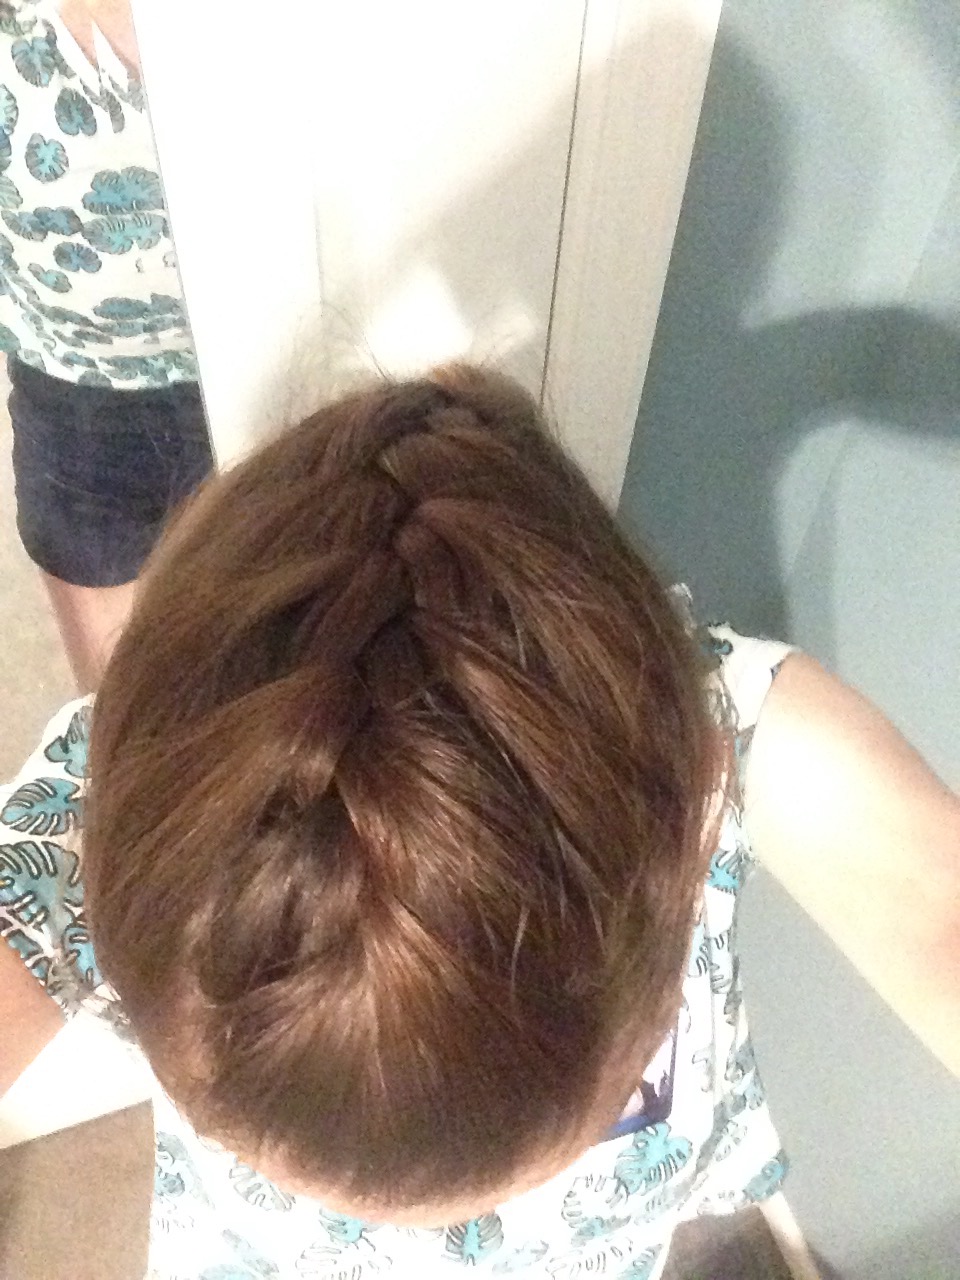
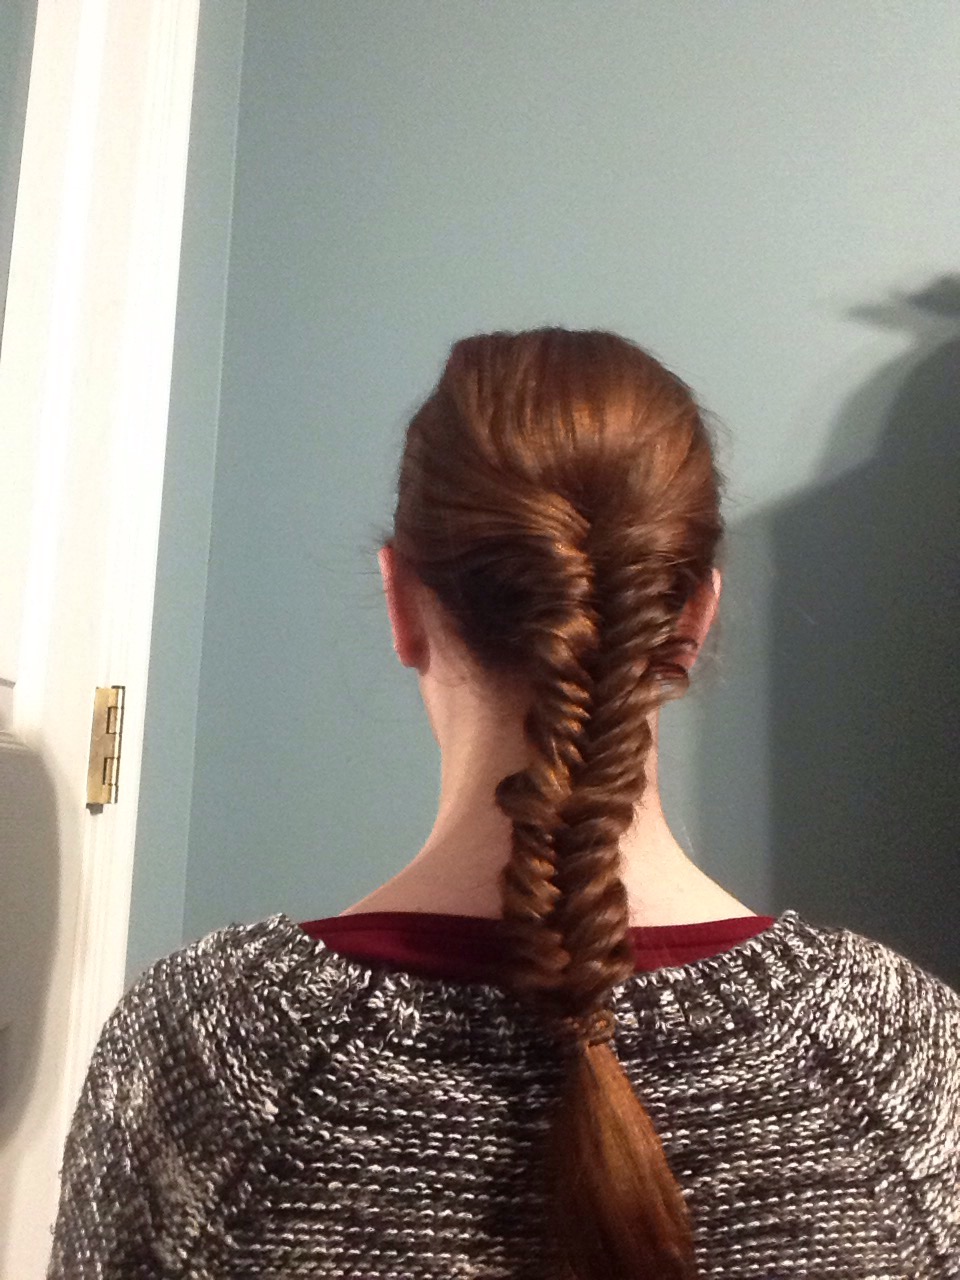
3. French Braided Ponytail

1) Comb your hair back.

2) Loosely French braid your hair, adding large sections to your braid.

3) Once you finish taking sections, do not continue with a regular braid. Keeping the braid, put the rest of the hair in a ponytail.

image

4) Taking a small section of hair, wrap it around your elastic, tuck the ends of it in the elastic, and bobby pin it in.

image

4. Easy twisted bun

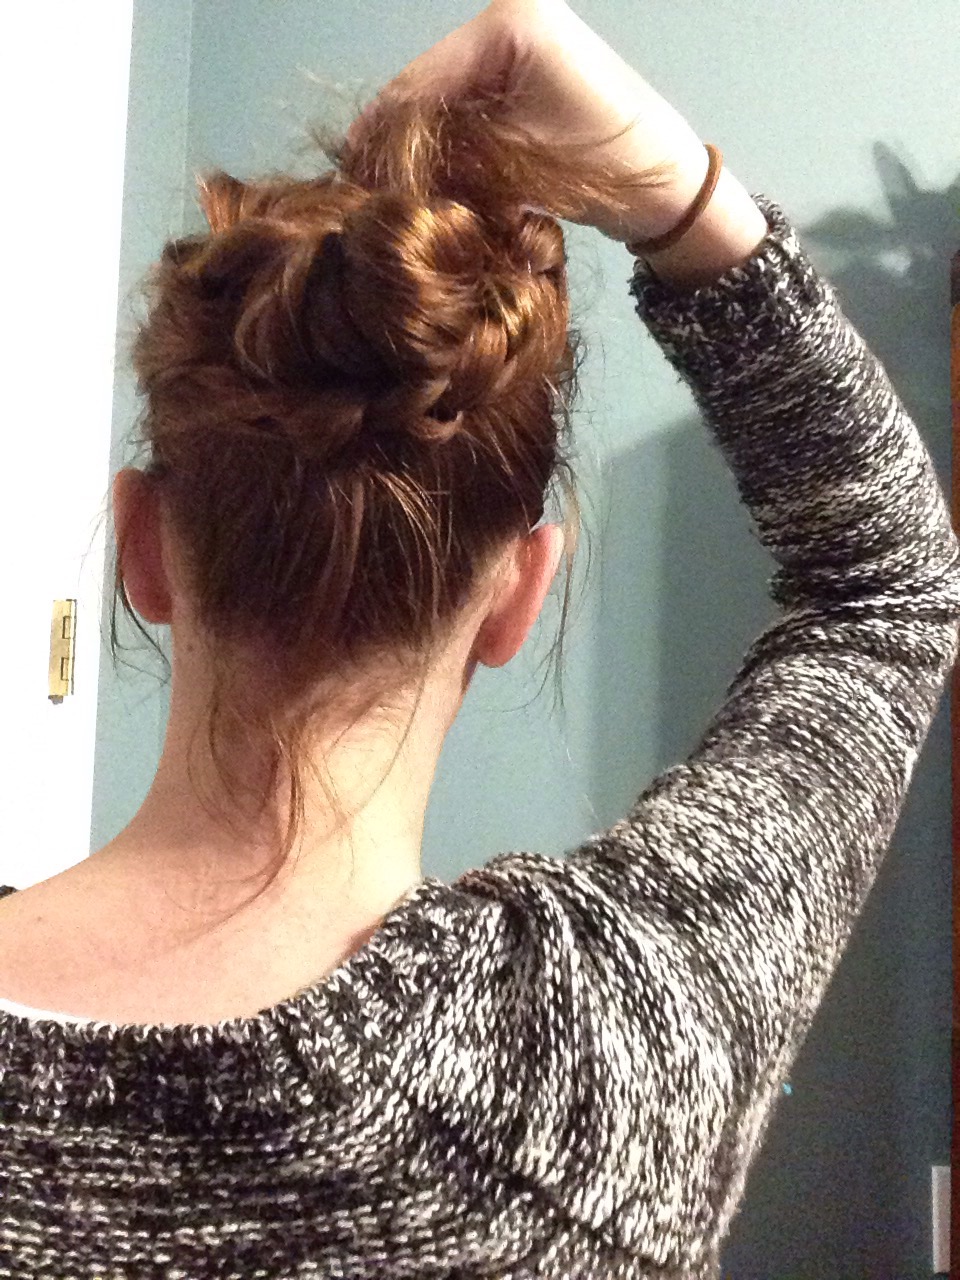
1) Flip your head upside-down, brushing out all bumps in your hair in the back and front of your head.

2)  Hold it like you would for a  ponytail,  then flip your hair back up and secure it with an elastic.

image

3) Pull your ponytail up, and twist it upwards as much as you can.

image

4) Twist your hair around the base of your ponytail, then secure it with another elastic.

5) (optional)  Add some cute hair accessories.

image

Velvet bows: Forever 21, $3

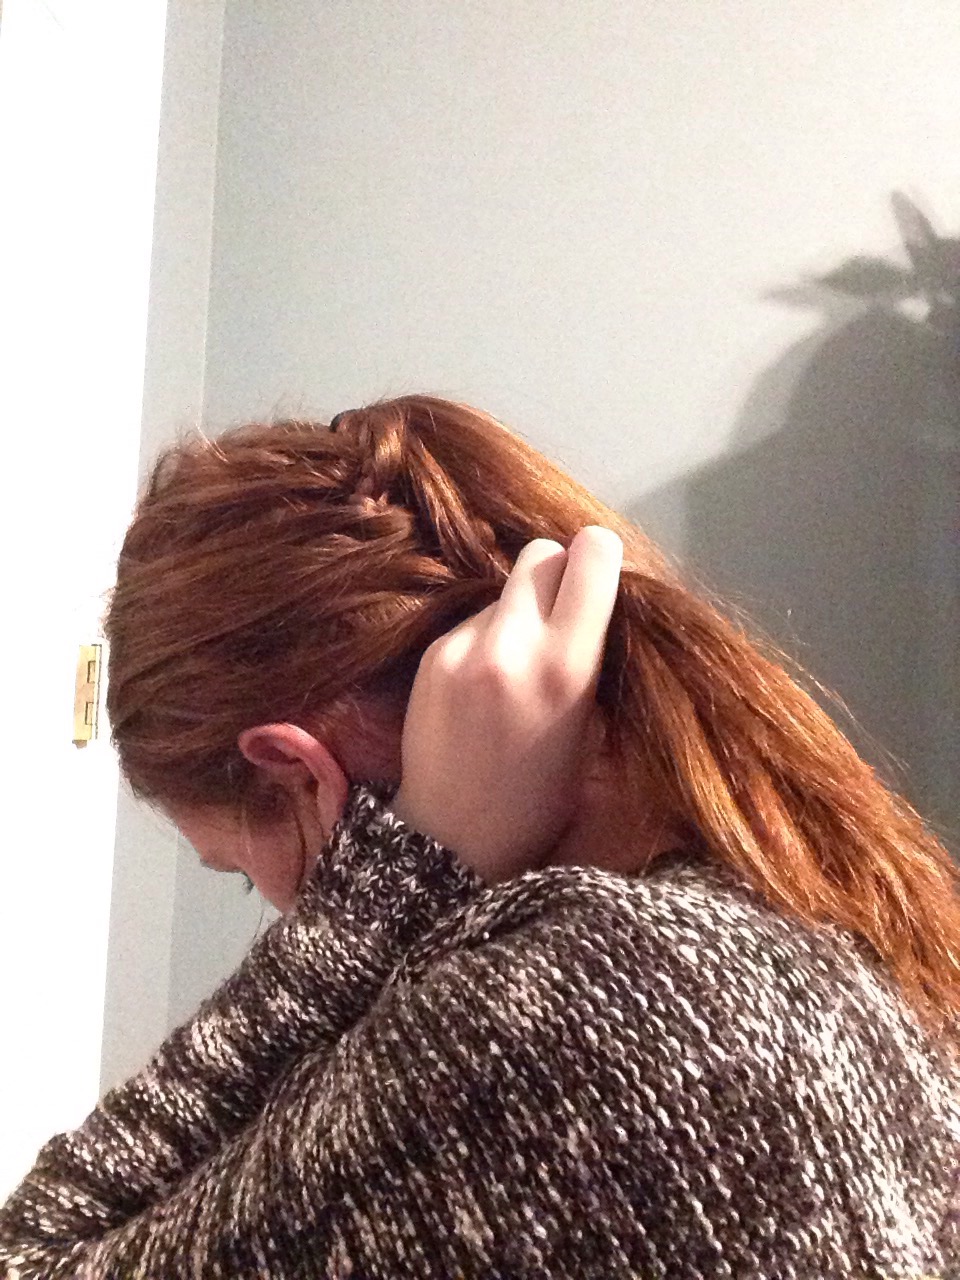
5. Fishtail pigtails

1) Part your hair down the middle.

image

2) Put two equal sections of hair on both sides of your head.

3) Fishtail braid both sections. Here is my older blog post on how to fishtail braid if you don’t know how:

https://nicolefemme2000.wordpress.com/2014/12/31/how-to-fishtail-braid/

4) Pull apart your braids so they are looser, and look more messy to have that boho type of vibe.

image

That’s all for this post! I hope you enjoyed it,  and see you next time!

PS: This was supposed to be posted yesterday, so sorry about the delay.

How to fishtail braid

Hey guys! For today’s post, I wanted to show y’all how to do a fishtail braid. I love the fishtail braid because it looks complex but it’s very simple and it looks beautiful when done. Let’s get right into it!

Step 1:

/home/wpcom/public_html/wp-content/blogs.dir/0bf/76212855/files/2014/12/img_1490.jpg

Comb your hair through to get rid of all tangles and comb it backwards. Then separate it into two sections.

Step 2:

/home/wpcom/public_html/wp-content/blogs.dir/0bf/76212855/files/2014/12/img_1491.jpg

Take a small section of hair from the outer edge of the section on the left, and cross it to the inner part of the section on the right.

Step 3:

/home/wpcom/public_html/wp-content/blogs.dir/0bf/76212855/files/2014/12/img_1492.jpg

Take a section about the same size as the other section from the outer edge of the right section, and bring it to the inner part of the left section so that the little sections cross.

Repeat steps 2 & 3 and the braid should start to look like this:

/home/wpcom/public_html/wp-content/blogs.dir/0bf/76212855/files/2014/12/img_1498.jpg

Once you get your braid to look like this, just continue where you left off. It’s ok to gradually use smaller sections as you get closer and closer to the end of the braid, just make sure to make them the same size. And also make sure to pull the sections tight so the braid won’t fall out.

The end result:

/home/wpcom/public_html/wp-content/blogs.dir/0bf/76212855/files/2014/12/img_1494.jpg

That’s all for this hairstyle! I hope you enjoyed it, and see you guys next time!

French braided bun

Hey guys. I found this hairstyle on Pinterest a while ago and I wanted to recreate it and write out some instructions for you so you can do it too. It’s fairly easy if you know how to french braid. Let’s get right into it.
1) Comb the tangles out of your hair and comb it all back.
2) Comb a small front section forwards and put it in a ponytail.
3) Comb the rest of the hair back into a ponytail.

IMG_1365.JPG
4) Make sure all of your hair is combed through with no tangles.
5) Take the front section of hair out of the ponytail holder.
6) Take a small section of hair from the front section and two sections of equal size from the big ponytail and start braiding them.

IMG_1366.JPG
7) Gradually add sections from either section and french braid them in.
8) Once you have used up all of the front section, just French braid sections into the rest of the braid from the ponytail.

IMG_1367.JPG
9) Twist the braid around the ponytail as you braid.

IMG_1368.JPG
10) After you have French braided the rest of the hair from the ponytail, braid the rest of the hair normally, and bobby pin the end of the braid. Then tuck the end of the braid in the bun and bobby pin it in.

IMG_1370.JPG

IMG_1369.JPG
And you are done! This is super simple once you get the hang of it, and a nice twist on a bun too. Plus if you sleep in it it will make your hair curly. That’s all for today. See you next time!

PS: My bun looked kind of weird, so I included the picture I used for reference so you might be able to see it better.

IMG_1371.JPG